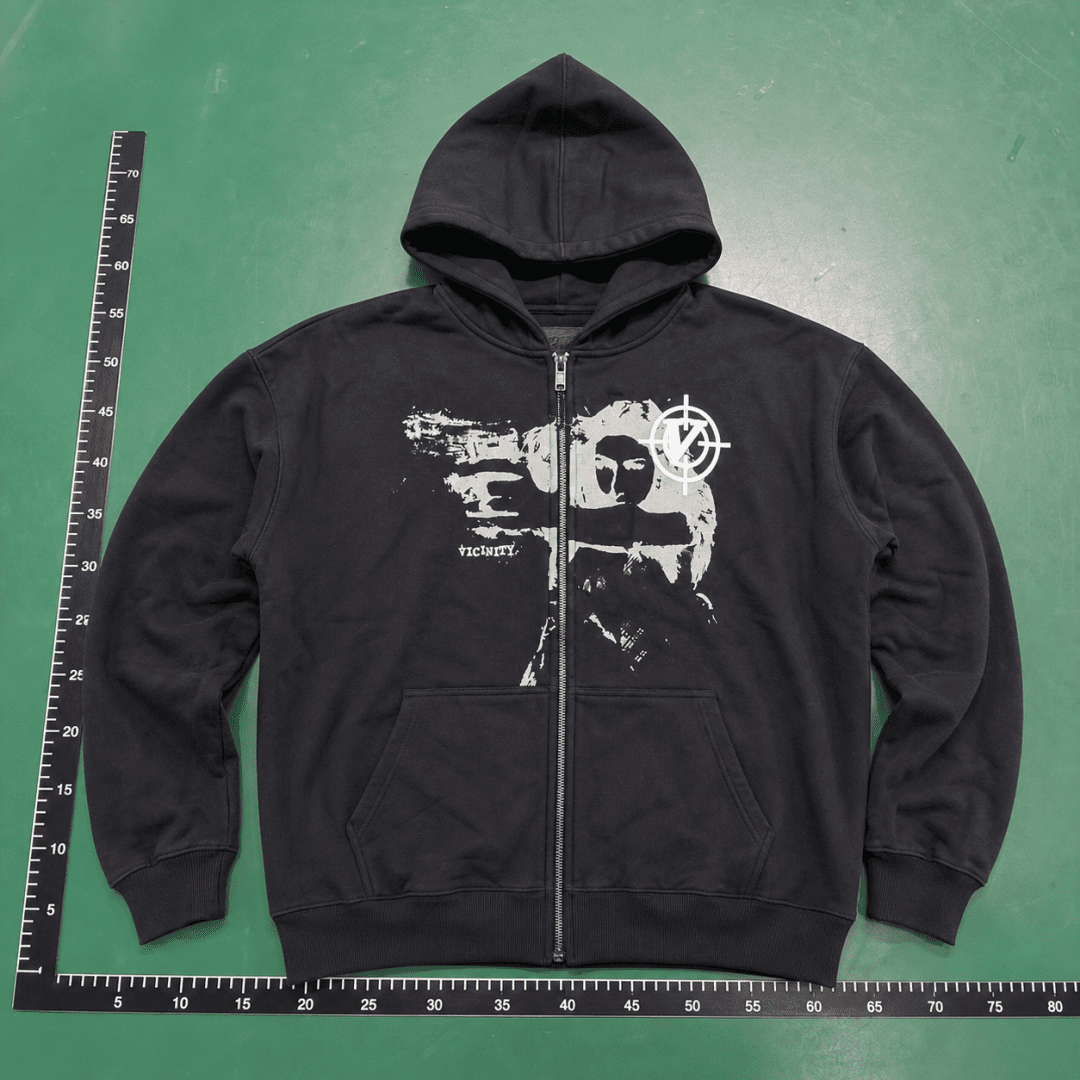
After purchasing a vicinity hoodie, the most important thing before shipping is not to judge "quality" from a few photos, but to confirm that the QC photos actually correspond to the item you bought and that key areas are clearly captured. For this black vicinity hoodie, it's recommended to follow this order: product correspondence, color and style, size tag, print or embroidery, structural details, and obvious flaws. Unclear areas should be marked as insufficient evidence, and if necessary, request additional photos; do not treat parts not shown in the photos as passed.
Start from the product detail page to enter the corresponding QC gallery
First open the product detail page of this item, then click "View QC Photos" on the page to enter the QC image area for that specific product. Do not judge based on images from the homepage, brand page, category page, or other products, and do not guess the source solely from image file names.
The item to be checked here should be the vicinity black hoodie listed on the detail page. The existing page data also lists different product entries that may appear on the same page, so the first step is to confirm that the product name, style, and order object in the images correspond. If the images do not contain enough information to prove correspondence, you should pause the shipping decision.

Caption: This image is used to illustrate the scope of QC evidence for the vicinity hoodie discussed in this article; it does not replace a photo-by-photo inspection of the original QC images before shipping.
Step 1: Verify the product corresponds
Look at the overall appearance of the garment first, then the details. What needs to be confirmed is not whether it "looks like a hoodie," but whether it matches the vicinity product, color, and style in your order.
You can record in the following order:
- Whether the product name or page identifier matches the order item.
- Whether the main color matches the ordered color. Black, dark gray, and dark purple in low light may look similar in photos; do not conclude based solely on screen appearance.
- Whether it is a hooded style, and whether it is a zip-up or pullover.
- Whether the chest, back, or sleeves have the pattern positions that match this style.
- Whether other garments, different colors, or significantly different cuts appear in the image; avoid mistaking other items from the same batch for your own.
If only a partial view is captured and the overall style cannot be confirmed, classify it as insufficient visual evidence, not as a direct judgment that the product corresponds. If there is an obvious different color, structure, or pattern position, ask the warehouse to re-confirm the product code or provide a complete flat-lay photo.
Step 2: Check the size tag, but don't treat tag photos as a guarantee of size
The size tag is important evidence for checking the product, but it only shows whether the tag is visible in the photo; it cannot replace actual measurements or prove that the garment fits as expected.
Focus on three things:
- Whether the size tag is exposed and the text is legible.
- Whether the size tag is located at the collar or another reasonable position and indeed belongs to this hoodie.
- Whether the tag is folded, obscured, reflective, or compressed beyond recognition.
Results can be divided into three categories:
| Judgment Category | Conclusion Supported by the Image | Next Step |
|---|---|---|
| Visible | The size tag is fully exposed, text is legible, and it corresponds to the garment | Record the tag information and continue checking measurement needs |
| Insufficient visual | Only the edge of the tag, text blurred, or cannot confirm it belongs to this item | Request a close-up, front-facing, non-reflective photo of the size tag |
| Needs reshooting | No size tag photo, or tag completely obscured by the garment | Request a new photo before shipping, and if necessary, also request flat-lay measurements |
If you are concerned about body length, chest, or sleeve length, just looking at the size tag is not enough. Depending on the services provided by the platform and warehouse, ask if additional flat-lay measurement photos can be taken. Without actual measurement data, do not interpret the size tag as a guarantee of fit or size accuracy.
Step 3: Check print, embroidery, and placement
For prints or embroidery, examine the content, position, and edge condition. Photos can only show the current appearance; they cannot guarantee durability after washing or determine authenticity.
Check the following:
- Whether the design appears in the position expected for this style.
- Whether the design is obviously offset, inverted, or cut off by zippers, pockets, or other structures.
- Whether the print edges have obvious cracking, peeling, gaps, or excessive color bleeding.
- Whether embroidery has obvious skipped stitches, long loose threads, or partial unraveling.
- Whether the back design is complete; do not only look at the front partial view.
Here, distinguish between "visible in photo" and "editorial judgment." For example, if the photo shows the design on the chest, you can only record that the position is visible; whether it matches the original design, is durable, or is authentic exceeds what this set of QC photos can prove. If the design is obscured by folds, shadows, or low resolution, request a front flat-lay photo and a close-up.
Step 4: Check hood opening, cuffs, hem, and stitching
Structural details are best checked with close-up photos, but not all problems can be found in distant shots. Examine the garment part by part, focusing on areas subject to stress and wear:
- Hood opening: Check for obvious deformation, loose threads, or stains on the drawstring holes, hood edge, and connection areas.
- Cuffs: Check for obvious damage, looseness, severe asymmetry, or foreign objects on the ribbing.
- Hem: Check if the edge is even, and whether there are loose threads, curling, or obvious dirt.
- Zipper and hardware: See if the zipper pull, zipper tape, and attachment points are visible; if no close-up, do not infer smoothness.
- Stitching: Check shoulders, armholes, side seams, pockets, and hood attachment for obvious skipped stitches, broken threads, or large uneven areas.
Problems clearly shown in the photo can be recorded as visible flaws; areas not covered by the photo should be marked as unchecked. Do not write "no flaws" just because you did not see any in the distant shot.
Step 5: Divide observations into three evidence states
Before shipping, it is better not to simply write "pass" or "fail," but to clearly state the evidence status for each checkpoint.
Visible in photo means that the area was clearly captured and supports limited visual observation. For example, the size tag text is readable, or the cuff edge is clearly visible in a close-up.
Insufficient visual means that the photo seems to show the area, but angle, distance, lighting, or obstruction makes judgment unreliable. For example, you can see part of the print but cannot confirm the full position; or you can see the collar but cannot read the tag.
Needs reshooting means that this item is directly related to whether to ship, and the existing photos do not provide the necessary evidence. For example, there is no full flat-lay photo, no close-up of the size tag, or key stitching areas are completely uncovered.
This layering helps avoid mistaking editorial assumptions for product facts and makes reshooting requests more specific.
A ready-to-use reshooting checklist
If the current QC photos are not clear enough, you can make the following requests all at once:
- Full front flat-lay photo to confirm color, style, and overall product correspondence.
- Full back flat-lay photo to confirm the position and completeness of back print or embroidery.
- Close-up of the size tag at the collar or inside, with readable text and no glare or obstruction.
- Front close-up of the chest, back, and sleeve designs, including edge details if necessary.
- Close-ups of the hood opening, cuffs, hem, and main seams.
- Local photos of the zipper or other hardware; if you need to confirm dimensions, ask if flat-lay measurement photos can be provided.
- Local photos of suspicious stains, damage, loose threads, or obvious color differences, along with a positioning photo of the whole garment.
Reshooting requests should point to specific locations, not just say "please check quality." This makes it easier to obtain evidence that can be reviewed.
When to pause shipping
Consider pausing shipping and confirming the handling with the purchasing platform or agent in the following situations:
- Cannot prove that the QC photos correspond to your vicinity hoodie.
- Color, style, zipper structure, or print position is obviously inconsistent with the order information.
- Size tag is missing or blurry, and you need to rely on the tag to confirm size.
- Key prints, stitching, or structural areas are obscured, and cannot be judged before reshooting.
- Obvious stains, damage, loose threads, severe offset, or other unacceptable appearance issues are found.
Also consult about the specific conditions for return, re-inspection, or reshooting. Different platforms and sellers may have different policies; this article does not have enough evidence to promise that returns are possible or that reshoots will meet your personal standards.
QC photos help you collect evidence of product correspondence and appearance before shipping. They support limited judgment about visible content in the photos, but cannot alone prove authenticity, durability, fit, or seller reliability. For this vicinity hoodie, the safest order is to first confirm product correspondence, then check the size tag and print placement, and finally examine structure and obvious flaws; any key area not clearly photographed should be kept as unconfirmed.